Cold Transfer (Unattended Transfer)
Call Diagrams and Workflows
Each of the transfer types above is illustrated in the below diagrams. The diagrams illustrate what action and/or API should be used at each setup, and how.
Description
This scenario is based upon a single Cloudonix API request, called switch voice application. Upon issuing the request,
the voice agent will automatically disconnect from the call with the caller, and the caller will be redirected to the human
agent, using a simple CXML document.
Workflow Outline
- An inbound call is accepted at Cloudonix for the phone number
+12127773456. - The call is routed to ReTell using the Register Phone Call API request.
- The voice agent issues a
switch voice applicationrequest to Cloudonix, using the agent destination number and a well-formatted CXML document. - Cloudonix removes the voice agent from the call and disconnects it, following the completion of
switch voice application.
Workflow Implementation
To implement this workflow, you would need to:
- Create a Container Application to process the inbound call to Cloudonix and respond with a static CXML document.
- Create a Voice Application to execute the Container Application mentioned in step 1, based upon the inbound call phone number.
- Create a ReTell function, to initiate the transfer, based upon a static CXML application that will be included in the function call.
Step 1: Inbound Calls Processing Container Application
Use the script in the following example, to route calls from the world to your Retell voice agent, via Cloudonix.
Retellai: Pre-Call Webhook Routing
We will assume that your container application is named smartTransfers and that the relevant container application block is named staticRoutingToReTell.
Sample smartTransfers container application code
const httpClient = require('https');

/* ReTell API Config */
const retell_token = '{{ put_your_retell_api_token_here }}';
let retell_agent = '{{ put_your_default_retell_agent_id_here}}';

/* This function provides a simple way to manage multiple inbound phone numbers routing */
function selectAgentIdByNumber(ev) {
  switch (ev.parameters.To) {
    case "+12127773456":
    case "12127773456":
      retell_agent='your_agent_id_here';
      break;
    default:
      retell_agent='you_default_agent_id_here';
      break;
  }
}

/* Handle HTTP outbound requests to Retell and other APIs */
async function httpsRequest(url, method = 'GET', headers = {}, body = null, requestTimeout = 5000) {

  const start = Date.now();

  let response;

  if (method === 'POST') {
    response = await httpClient.post(url, { headers, body });
  } else if (method === 'PUT') {
    response = await httpClient.put(url, { headers, body });
  } else if (method === 'DELETE') {
    response = await httpClient.delete(url, { headers });
  } else if (method === 'GET') {
    response = await httpClient.get(url, { headers });
  } else {
    throw new Error(`Unsupported method: ${method}`);
  }

  const elapsed = Date.now() - start;
  if (elapsed > requestTimeout) {
    console.log(`[httpsRequest] HTTP Request ${method} to ${url} timed out after ${elapsed} mSec`);
    return false;
  }

  const status = response.status || response.statusCode || 0;
  const ok = status >= 200 && status < 300;
  const responseBody = typeof response.body === 'string'
    ? response.body : JSON.stringify(response.body || {});

  return {
    status,
    ok,
    body: responseBody,
    headers: response.headers || {}
  };
}

/* Register a new phone call on Retell */
async function getRetellCallId(ev) {
  const url = 'https://api.retellai.com/v2/register-phone-call';

  // SIP headers from Cloudonix
  const inboundSipHeaders = JSON.parse(ev.body).SessionData.profile['trunk-sip-headers'];

  /* Register the Cloudonix LLM variables, we'll need these later on */
  const retellDynamicVariables = {
    cloudonix_callerid: ev.parameters.From,
    cloudonix_destination: ev.parameters.To,
    cloudonix_token: ev.parameters.Session,
    cloudonix_domain: ev.parameters.Domain
  };

  /* Document the inbound SIP headers, these come in handy for debugging purposes */
  for (const key in inboundSipHeaders) {
    retellDynamicVariables[key] = inboundSipHeaders[key];
  }

  const payload = {
    agent_id: retell_agent,
    from_number: ev.parameters.From,
    to_number: ev.parameters.To,
    retell_llm_dynamic_variables: retellDynamicVariables
  };

  console.log(`[getRetellCallId] Payload: ${JSON.stringify(payload)}`);

  const headers = {
    'Content-Type': 'application/json',
    'Authorization': 'Bearer ' + retell_token
  };

  try {
    const response = await httpsRequest(url, 'POST', headers, JSON.stringify(payload));

    if (!response.ok) {
      throw new Error(`[getRetellCallId] ReTell call registration failed: ${response.status} - ${response.body}`);
    }
    const data = JSON.parse(response.body);
    console.log(`[getRetellCallId] Success: ${data.call_id}`);
    return data.call_id;
  } catch (error) {
    console.error(`[getRetellCallId] Error:`, error.message || error);
    await deleteSession(ev.parameters.Domain, ev.parameters.Session);
    return false;
  }
}

/* Build a simple Retell dialing CXML document */
function dialToRetell(ev, retellCallId) {
  let result = `<Dial callerId="${ev.parameters.From}">\n`;
  result += `  <Service provider="retell">${retellCallId}</Service>\n`;
  result += `</Dial>`;
  return result;
}

/* Build the formatted CXML response */
function response(content) {
  let result  = `<?xml version="1.0"?>`;
  result += `<Response>${content}</Response>`;
  return result;
}

/* Container Application Request Handler */
exports.handler = async (ev) => {
  selectAgentIdByNumber(ev);
  const retellCallId = await getRetellCallId(ev);
  if (!retellCallId) {
    console.log(`[handler] ReTell call registration failed`);
    return response("<Reject reason='rejected' />");
  }
  const retellCxml = dialToRetell(ev, retellCallId);
  return response(retellCxml);
};
Step 2: Voice Application Attachment and Call Routing
Now, let's attach our Container Application to a new Voice Application and define the inbound phone number. From the Cloudonix dashboard, click the Applications menu option, and create a a new Voice Application, using the following parameters:
| Parameter | Value |
|---|---|
Application Name | eg. inbound_call_to_retell |
Application Resource Type | Container Application Resource |
Container Application Resource | Select the previously created smartTransfers container application |
Entry Block | Select the previous created main block of the smartTransfers container application |
Once completed, a new line will be added to your voice applications view, containing the following information:
| Name | Application Resource ID | DNID |
|---|---|---|
inbound_call_to_retell | smartTransfers::main | - |
Now, click the cog icon on the right side, to edit the voice application settings. Once in the next screen, click the plus button, to create a new DNID (Phone number) to assign to your voice application:
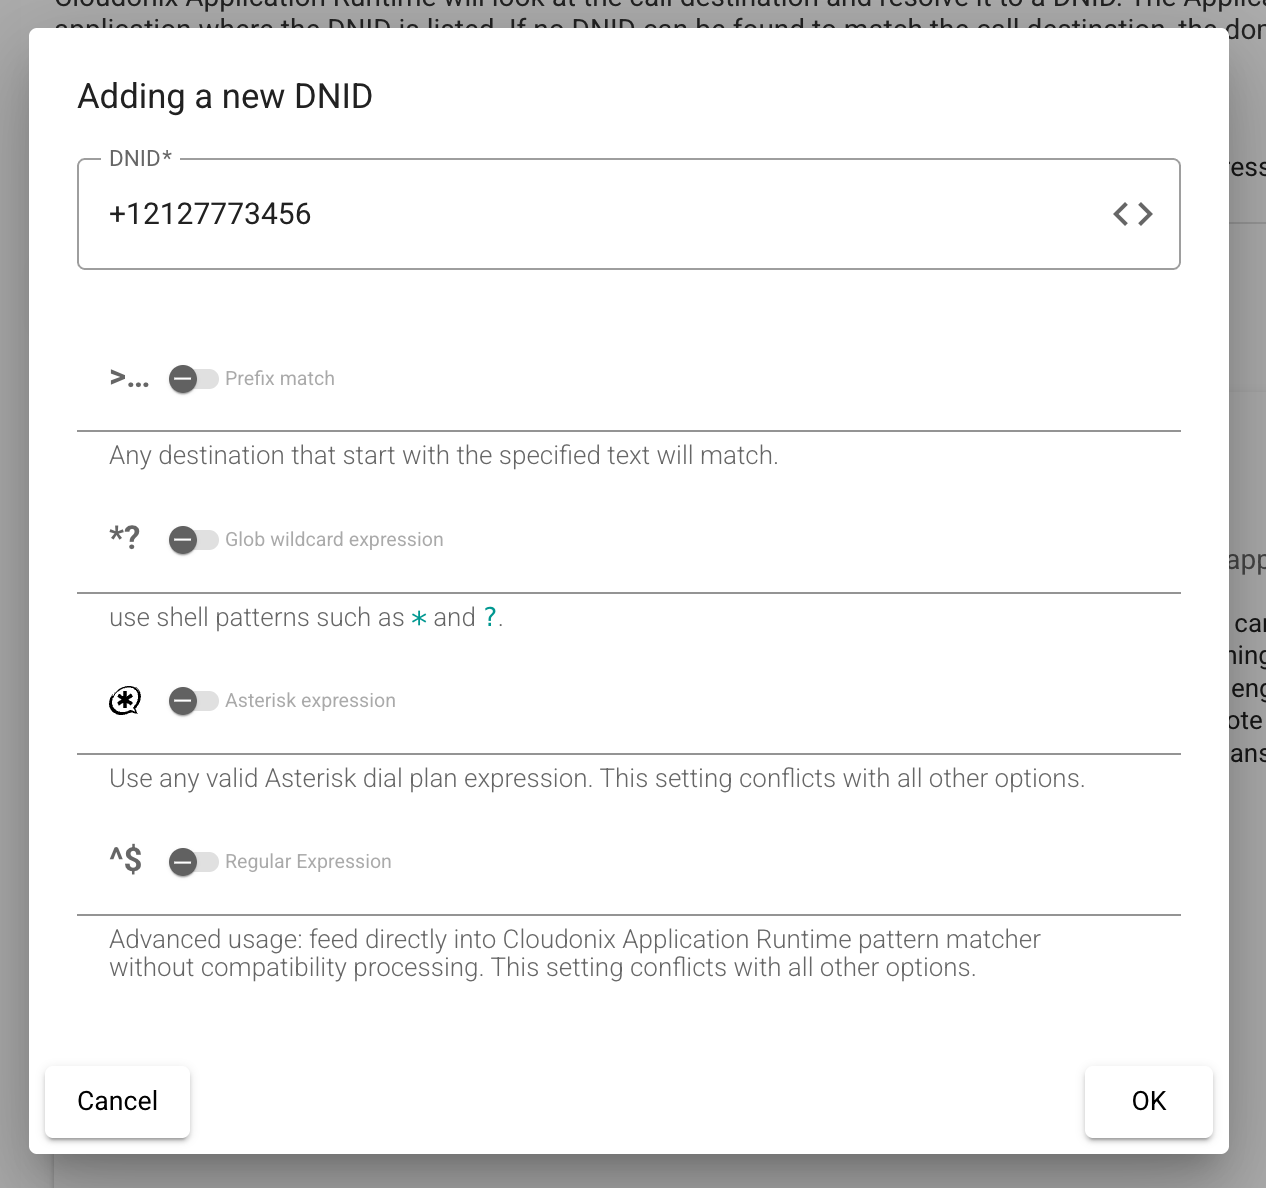
Let's review the available options for the DNID:
| Option | Description |
|---|---|
DNID | A string representing the DNID to attach to the application, or a pattern of. |
Prefix Match | The DNID entered is formatted as a Prefix Match showing the start of the DNID only. |
Glob Wildcard Expression | The DNID entered is formatted as a Global Wildcard Expression, eg: 1212777*. |
Asterisk Expression | The DNID entered is foramatted as an Asterisk dialplan expression, eg: 1212777XXXX. |
Regular Expression | The DNID entered is formatted as a Regular Expression. |
To learn more about container applications, voice applications and phone numbers (DNIDs), click any of the links below:
Step 3: ReTell Function for Transfer Initiation
Unlike ReTell's normal transfer calling function, we need to implement a new transfer function, using a Custom Fucntion. Below is what our customer function will look like:
- Function Name:
cold_transfer - Description:
Transfer the inbound call to human agent 10000 on the connected PBX - Endpoint:
https://your.favorite.nocode.platform/cold_transfer - Parameters:
{
  "type": "object",
  "properties": {
    "transfer_destination": {
      "type": "string",
      "description": "Where should the call be transferred to"
    }
  },
  "required": [
    "transfer_destination"
  ]
}
Once your custom function is invoked, it should produce the following HTTP Request to Cloudonix:
- Endpoint URL:
https://api.cloudonix.io/calls/{cloudonix_domain}/sessions/{cloudonix_token}/application - Endpoint Method:
POST - Request Body:
{
  "cxml": "<Response><Dial trunks='my_pbx'>{transfer_destination}</Dial></Response>",
  "method": "POST"
}
The above {cloudonix_domain}, {cloudonix_token}, and {transfer_destination} are llm_variables, these should be pre-populated by your no-code scenario (or server side).