3CX
3CX is a software implementation of a private branch exchange (PBX) - provided as a cloud hosted solution or as an on-premise installation. For more information about 3CX, please visit the 3CX Website.
Pre-Requisites
The following guide assumes the following:
- You have a working 3CX instance, either in the cloud or on-premise.
- Your 3CX server is located behind a Static-NAT or has a public IP address.
- You are connected to your 3CX server, using an IP Phone or a soft phone.
This guide assumes that you are already well versed with 3CX, and thus, we'll not go through a step-by-step configuration guide.
While 3CX is a popular PBX vendor, it is not the ideal choice to connect with Cloudonix and potentially even other 3rd party providers, which are part of the 3CX eco-system. The primary reason is that to utilize 3CX to the fullest, along side 3rd party services such a Cloudonix®, ReTell™, VAPI™ and others, a 3CX enterprise license is required with access to Custom Call Scripts - which are relatively complex for most customers.
Step 1: Create a new SIP Trunk
Logon to your 3CX management portal, and click the "Admin" option, the select "Voice & Chat" option from the admin menu. Once the menu appears, click the "+Add Trunk" button to start the setup process:

Step 2: Trunk VoIP Provider
The following dialog will appear:
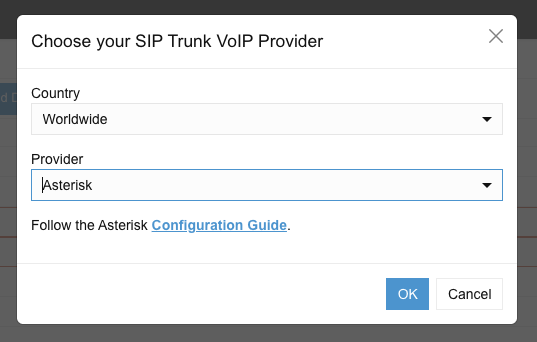
Select Worldwide as the country option and Asterisk as your provider.
After performing extensive testing with 3CX, we've discovered the select the Asterisk option as the provider creates the least amount of friction when configuring the SIP trunk with Cloudonix.
Step 3: Configure your Trunk
Once clicking OK, the following screen will appear:
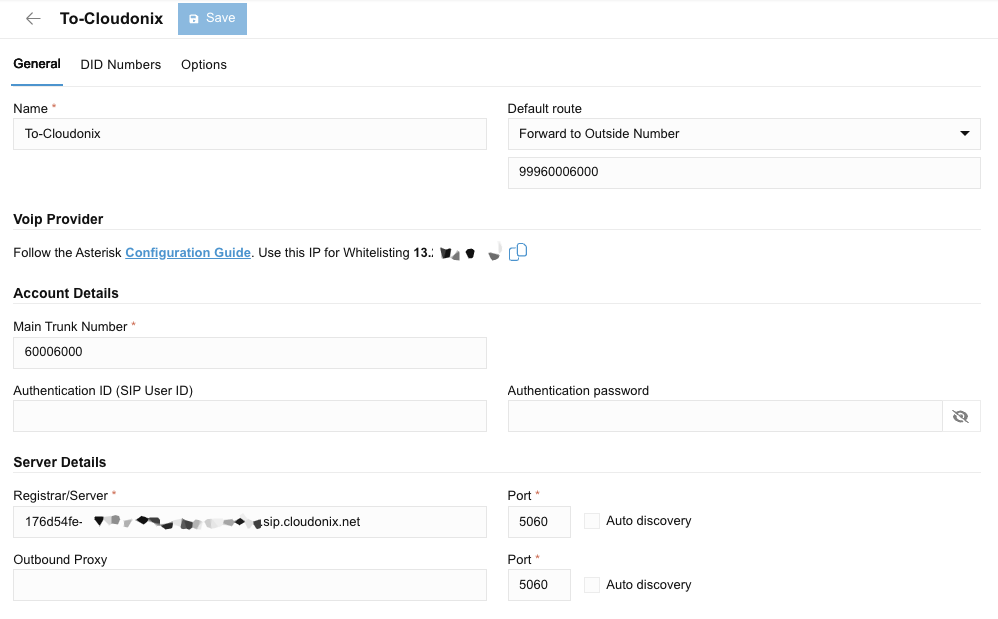
Give your new trunk a meaningful name, like To-Cloudonix, indicating that this trunk will carry calls from 3CX to Cloudonix. Assign a Main Trunk Number to this trunk, which can be an arbitrary number. This number will later on need to be configured in Cloudonix as a voice application DNID (Read more here). In addition, pay attention to enter your SIP trunk host name for inbound calls, which can be found under Inbound Trunks of your Cloudonix domain (Read more here)
As you can see above, we've set the default route to be 99960006000 - this is not mandatory, and should normally be set
to End Call. You can set the default route as above, to make sure that if something invalid is sent to the trunk, it will
default to the above configured dialed digits. We will explain what the 999 numbers mean later on.
Now, click the Options tab, and make sure the following options are set according to the below:
| Option | Value |
|---|---|
| Allow inbound calls | Disabled |
| Allow outbound calls | Enabled |
| Transport Protocol | UDP |
| IP Mode | IPV4 |
| SRTP Mode | Disabled |
| Include diversion header support | Enabled |
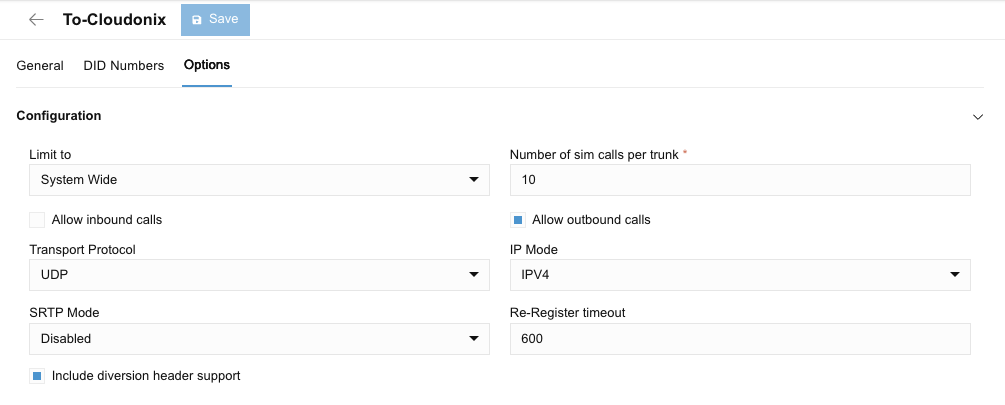
After you've entered all relevant information, click the Save button.
Step 4: Outbound route rule
Click the Outbound Rules option from the main admin menu, then click +Add, the following screen will appear:
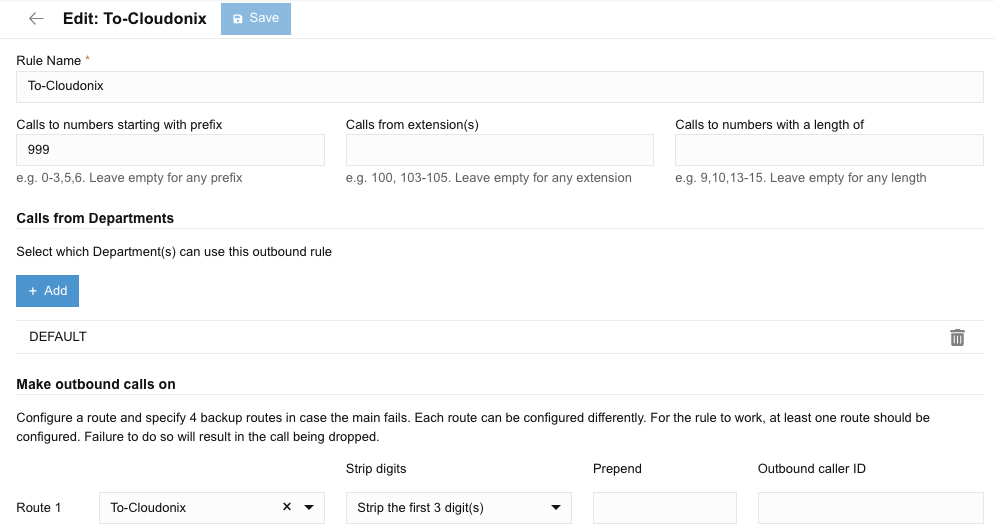
Give your rule a meaningful name, such as To Cloudonix. Create a rule that is based on Calls to numbers starting with prefix
and set the value to 999. This means, calls that will be made to numbers that start with 999 will be routed according to
this rule. Then set the Make outbound calls on to route via the previously created To Cloudonix SIP trunk,
while adding a rule to Strip Digits, namely the first 3 digits (the dialed 999).
According to the above rule, if the number that dialed was 99912127773456, it will be sent to Cloudonix, however,
the destination will be changed to 12127773456 - which is the phone number to be provisioned on Cloudonix, for your
voice application.
Step 5: Routing calls to Cloudonix
The following section assuemes that your 3CX PBX already has an inbound carrier connected, and you have phone numbers assigned to your PBX system.
To route calls from 3CX into Cloudonix, we'll need to create a User that will accept the inbound call from the connected trunk, and then, transfer the call to Cloudonix.
Click the Users option from the main admin menu, then click +Add User to create a new user.

The following screen will appear:
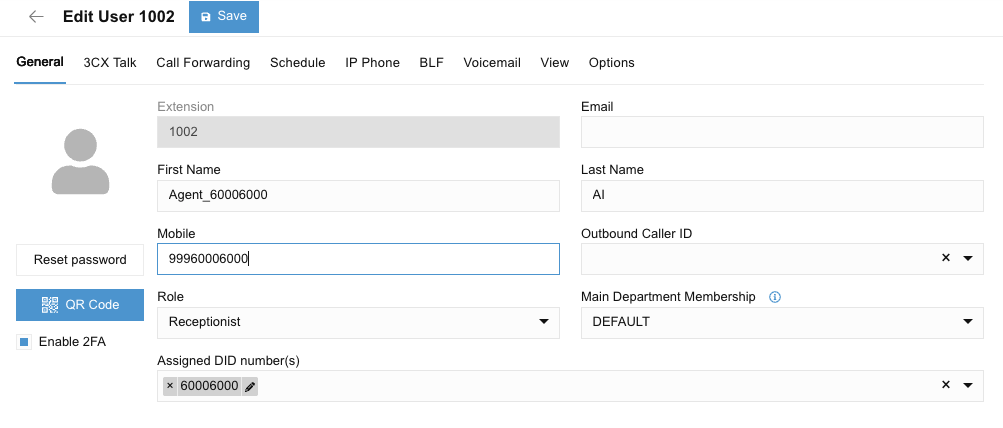
Give your user a meaningful First Name and Last Name and a Mobile number. The mobile number you will now
assign will be used to route calls into Cloudonix. Make sure to prefix the number with 999 - which will designate
the outbound route to Cloudonix. Pay attention to select the Assigned DID number for this user. Once selected,
calls made to the assigned DID number, will automatically be processed by the rules of this user.
Next, click the Call Forwarding tab, the following screen will appear:
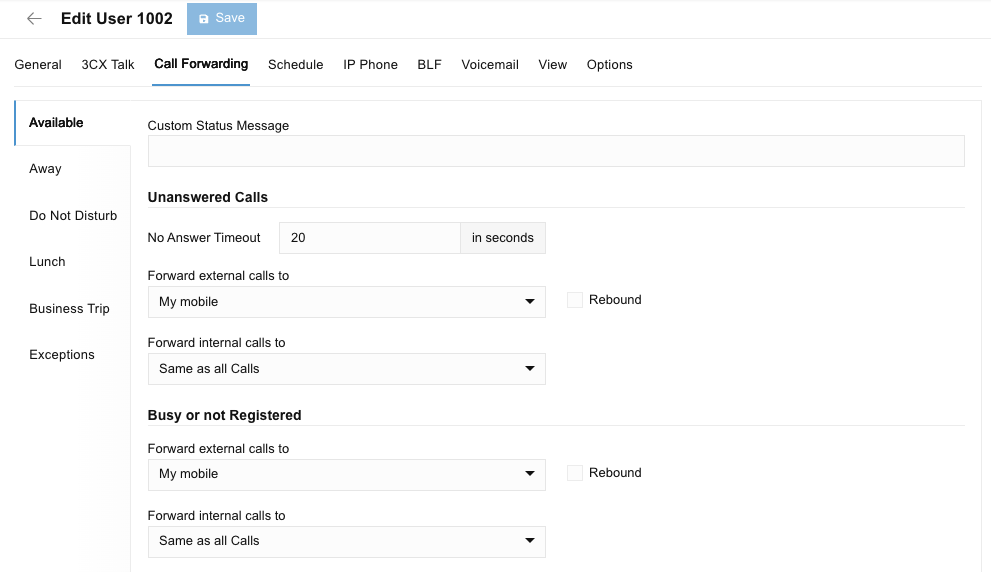
Set the Forward Calls destination to be My Mobile, so that all calls to this user will be automatically forward to the mobile, and thus, to Cloudonix.
Save your configuration—and you should be ready to go.
The primary issue with this setup is the following:
- The inbound CallerID being sent to Cloudonix will show the trunk primary number.
- The original CallerID is hidden from Cloudonix, as the call is Forwarded and not Routed.
The achieve proper routing functionality, a Custom Call Script is required, which requires additional 3CX licenses.