VAPI.ai SIP Trunking
VAPI.ai is a Voice AI platform for developers. Vapi lets developers build, test, & deploy voice AI agents in minutes rather than months — solving for the foundational challenges voice AI applications face.
You can integrate VAPI.ai with Cloudonix, enabling inbound and outbound calling to/from your Cloudonix voice applications. In addition, by integrating VAPI.ai with Cloudonix, you can integrate ANY VoIP Carrier in the world for usage with VAPI.ai.
As VAPI.ai is a developer oriented platform, the integration between Cloudonix and VAPI.ai is performed via execution of their API.
This tutorial demonstrates two ways to connect Cloudonix with VAPI.ai. We recommend using the cx-vcc tool, and not
using the manual API requests, to ensure that your setup is streamlined with Cloudonix and VAPI requirements.
If you hadn't yet installed the cx-vcc tool, please click here
for the CLI tool guide.
Using cx-vcc (recommended)
Configure the VAPI.ai Connector
To configure your connector, you will need your VAPI.ai API key. Create a unique key for your cx-vcc tool, then use
the following commend to configure it:
$ cx-vcc service --provider vapi --apikey YOUR_VAPI_API_KEY --name "Cloudonix SIP Trunk" \
--domain example.com
For example:
$ cx-vcc service --provider vapi --apikey aeacbbaa-xxxx-xxxx-xxxx-xxxxxxxxxxxxxx \
--name "My SIP Trunk" --domain cxguide.cloudonix.net

✔ VAPI API key configured successfully
API Key: ************************************
API URL: https://api.vapi.ai
✔ SIP trunk "My SIP Trunk" created successfully for domain cxguide.cloudonix.net

SIP Trunk Details:
Credential ID: aeacbbaa-xxxx-xxxx-xxxx-xxxxxxxxxxxxxx
Name: My SIP Trunk
Provider: byo-sip-trunk
Gateway IP: dd7a2a82-2457-3578-a63b-bd132950c857.sip.cloudonix.net
Status: active

Credential ID aeacbbaa-xxxx-xxxx-xxxx-xxxxxxxxxxxxxx saved to domain configuration
You may validate your connector configuration using the display command:
$ cx-vcc display
All domain configurations:

Domain: cxguide.cloudonix.net
API Key: ********
Alias: dd7a2a82-2457-3578-a63b-bd132950c857
Auto Alias: dd7a2a82-2457-3578-a63b-bd132950c857
Inbound SIP URI: dd7a2a82-2457-3578-a63b-bd132950c857.sip.cloudonix.net
Tenant: self
VAPI Trunk Credential ID: 83888eb6-e06f-4c7e-b10f-4cb7a553dd8b
Phone Numbers: None configured

VAPI Configuration:
API Key: ********
API URL: https://api.vapi.ai
Phone Numbers: None configured
Attach a phone number to an agent
Use the following command to add a new telephone number to your VAPI account. You will need to manually attach it to your selected agent, using the VAPI dashboard.
$ cx-vcc addnumber --domain example.com --provider vapi --number e.164_formatted_number
For example:
$ cx-vcc addnumber --domain cxguide.cloudonix.net --provider vapi --number +12127773456
✔ Phone number +12127773456 added successfully to vapi
Phone Number Details:
Number: +12127773456
SIP URI: undefined
ID: 420710fd-65ba-490c-bb56-20f0a5e306b3
Use the display command to validate:
$ cx-vcc display
All domain configurations:

Domain: cxguide.cloudonix.net
API Key: ********
Alias: dd7a2a82-2457-3578-a63b-bd132950c857
Auto Alias: dd7a2a82-2457-3578-a63b-bd132950c857
Inbound SIP URI: dd7a2a82-2457-3578-a63b-bd132950c857.sip.cloudonix.net
Tenant: self
VAPI Trunk Credential ID: 83888eb6-e06f-4c7e-b10f-4cb7a553dd8b
Phone Numbers:
    - VAPI
        - Number: +12127773456 (sip:+12127773456@api.vapi.ai)

VAPI Configuration:
API Key: ********
API URL: https://api.vapi.ai
Phone Numbers: None configured
That's it, your VAPI.ai and Cloudonix domain are now connected and ready for work.
Using VAPI dashboard
This method utilizes the VAPI dashboard and will allow you to setup your Cloudonix connection in VAPI. Logon to your VAPI dashboard, and select the External Provider Keys menu option. Scroll down to the SIP Trunk Credentials section of the page, and click the Configure New SIP Trunk button.
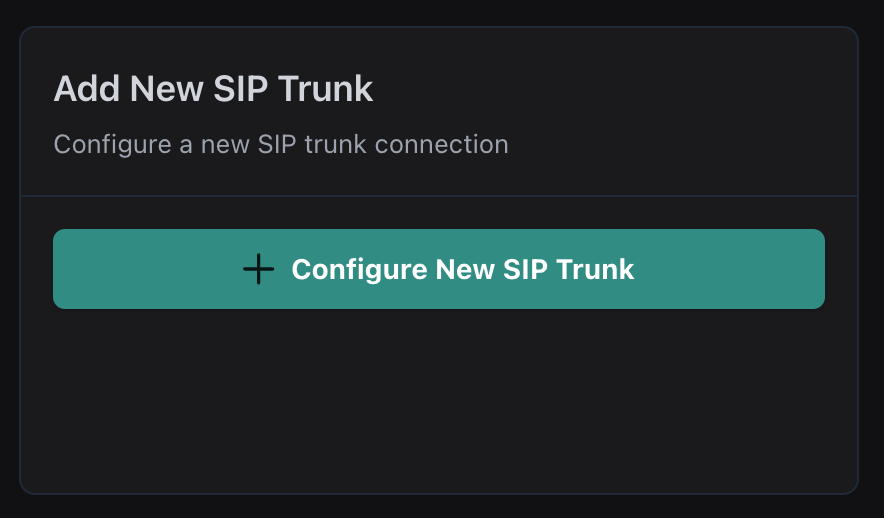
The following screen will appear:
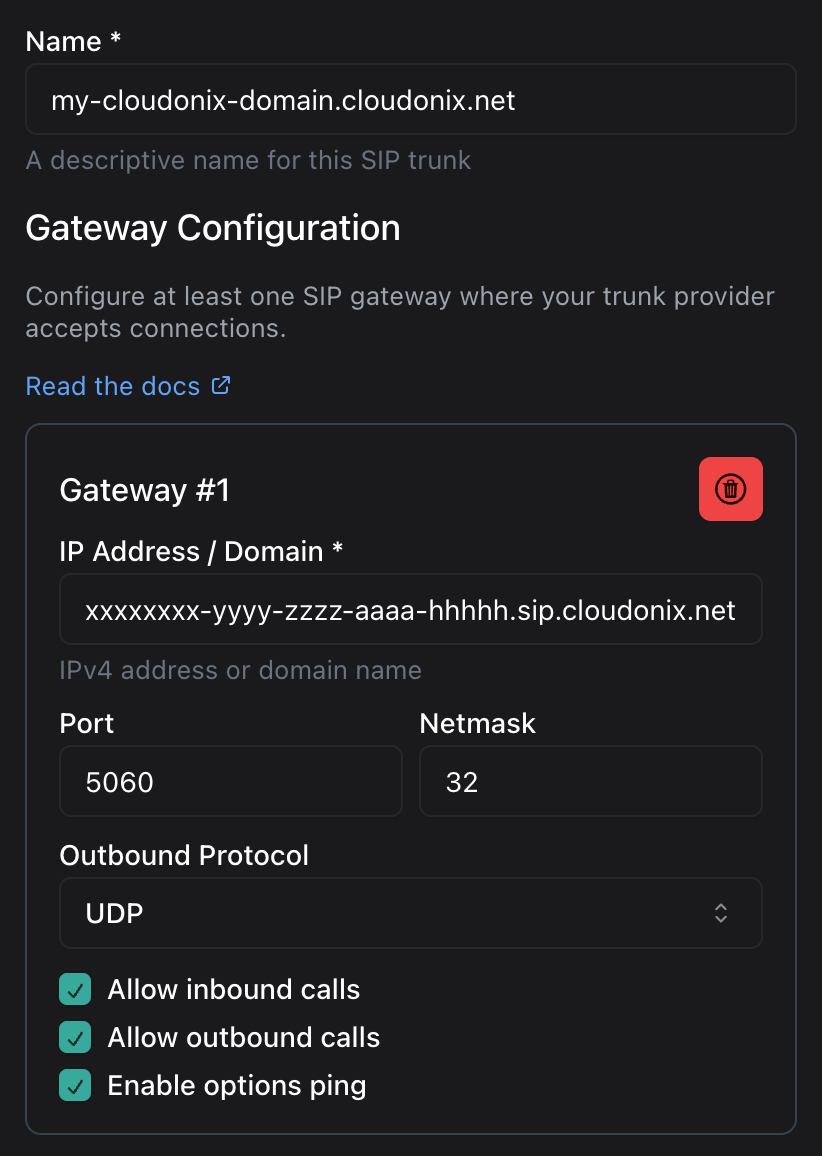
In the Gateway IP Address/FQDN enter your Cloudonix domain, inbound SIP domain name. Eg. dd7a2a82-2457-3578-a63b-bd132950c857.sip.cloudonix.net.
Make sure to enable all 3 options below: Allow inbound calls, Allow outbound calls and Enable options ping.
Cloudonix allows directly connected SIP endpoints to send SIP OPTIONS messages to its border gateways. We allow these, to enable our customers
to constantly monitor their connection with Cloudonix, and also maintain a keep-alive connection between VAPI and Cloudonix.
Now,scroll down to the Advanced Settings (Optional) section, the following screen will appear:
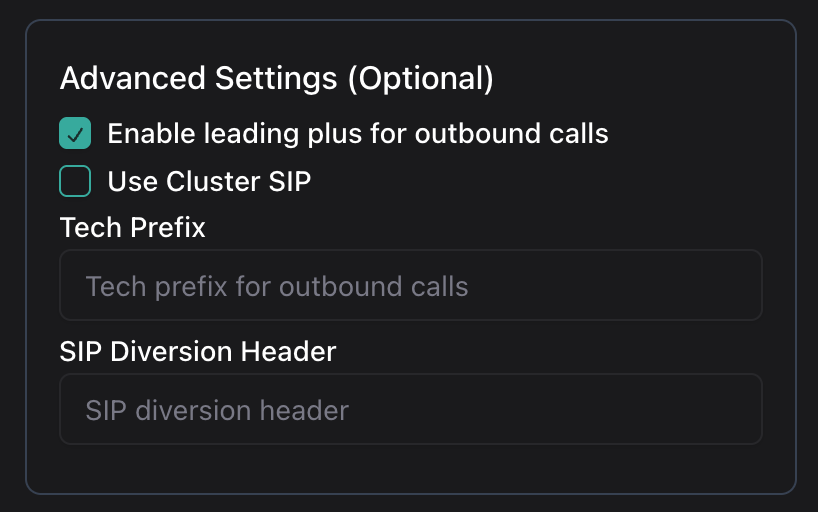
We recommend enabling the Enable leading plus for outbound calls, in order for conform to proper E.164 numbering format. This is an optional configuration, and it is up to you to decide if you want to use it or not.
The E.164 standard is an international telephone numbering plan ensuring each device on the telephone network has unique number, that is global and non-disputable. The following table illustrates the difference between local number format and E.164 number format.
| E.164 Format | Country Code | Country | Local Number | Subscriber Number |
|---|---|---|---|---|
| +12127773456 | +1 | US | 12127773456 | 2127773456 |
| +442071234567 | +44 | GB | 442071234567 | 02071234567 |
We recommend sticking with full E.164 numbering when using Cloudonix, in order to ensure that your call routing and phone number analysis is always unique.
Once you had configured your Cloudonix SIP trunk, you may assign your voice agent a phonenumber, using the Cloudonix BYO SIP Trunk you created. You VAPI account may include Cloudonix BYO SIP trunks to multiple Cloudonix domains, as long as you maintain a different SIP trunk for each domain seperatly.
Using Manual API calls
Inbound Calling (Cloudonix to VAPI.ai)
Create a SIP URI
You will need to create a personal VAPI.ai SIP URI to enable inbound calls from Cloudonix to your voice agent. Use the following API request example to create your personal VAPI.ai SIP URI:
curl --location 'https://api.vapi.ai/phone-number' \
--header 'Authorization: Bearer [your-vapi-private-api-key'] \
--header 'Content-Type: application/json' \
--data-raw '{
  "provider": "vapi",
  "sipUri": "sip:[username]@sip.vapi.ai",
  "assistantId": "[your-assistant-id]"
}'
Replace the username and your-asssitant-id with the your desired SIP URI and connected assistant ID. For example,
examine the following curl request:
curl --location 'https://api.vapi.ai/phone-number' \
--header 'Authorization: Bearer [your-vapi-private-api-key'] \
--header 'Content-Type: application/json' \
--data-raw '{
"provider": "vapi",
"sipUri": "sip:+12127773456@sip.vapi.ai",
"assistantId": "7f9c2e4b1a8d6f3h5g9k7m2n4p6r8t1v3x"
}'
In the above example, we will create a SIP URI that will be sip:+12127773456@sip.vapi.ai and the voice agent to attach
will be 7f9c2e4b1a8d6f3h5g9k7m2n4p6r8t1v3x.
In order to connect from Cloudonix to VAPI.ai, we'll use the <Dial><Service> verbs, which will enable a direct connection
to VAPI.ai.
Outbound Calling (VAPI.ai to Cloudonix)
To enable outbound calling from VAPI.ai to Cloudonix, you need to obtain your Cloudonix domain alias. Each Cloudonix has a domain alias, that is automatically created when the domain is created. Login to your Cloudonix account and selected your domain, then click the , the following screen will appear:
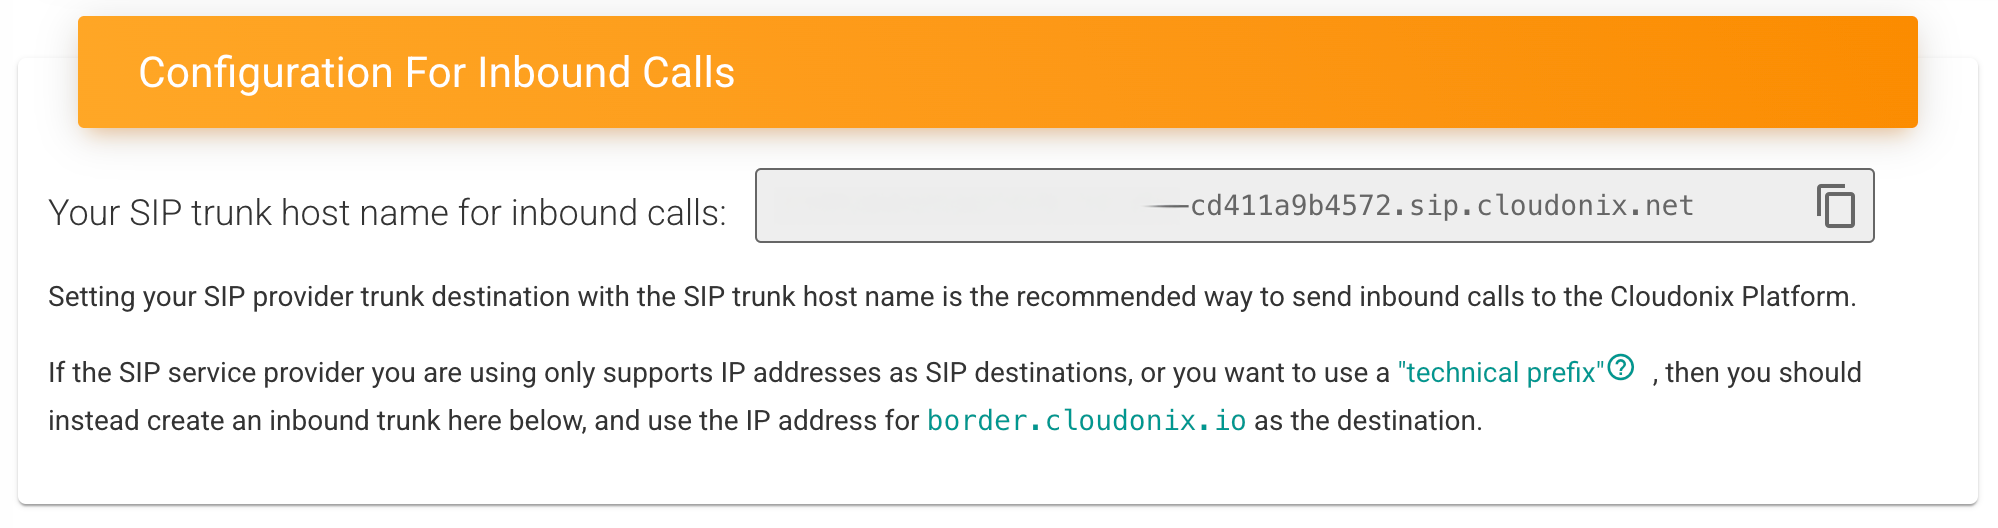
Copy the domain name that appears, you will need it for the next steps.
Setup your SIP Trunk
You will inform VAPI.ai that you have a new SIP trunk and you'll connect it to Cloudonix.
curl -X POST https://api.vapi.ai/credential \
-H "Content-Type: application/json" \
-H "Authorization: Bearer [your-vapi-private-api-key]" \
-d '{
  "provider": "byo-sip-trunk",
  "name": "Cloudonix Trunk",
  "gateways": [
    {
      "ip": "[your-cloudonix-inbound-domain-alias]"
    }
  ]
}'
For example, let's assume that your Cloudonix inbound domain alias is f47ac10b-58cc-4372-a567-0e02b2c3d479.sip.cloudonix.net,
then your request will be as following:
curl -X POST https://api.vapi.ai/credential \
-H "Content-Type: application/json" \
-H "Authorization: Bearer [your-vapi-private-api-key]" \
-d '{
  "provider": "byo-sip-trunk",
  "name": "Cloudonix Trunk",
  "gateways": [
    {
      "ip": "f47ac10b-58cc-4372-a567-0e02b2c3d479.sip.cloudonix.net"
    }
  ]
}'
Assign a phone number to the trunk
Now, you will assign a phone number for your outbound calls to Cloudonix. That phone number will be presented on your outbound calls to Cloudonix, as the origin caller ID number. The following request will assign a number to your newly created SIP Trunk.
curl -X POST https://api.vapi.ai/phone-number \
-H "Content-Type: application/json" \
-H "Authorization: Bearer [your-vapi-private-api-key]" \
-d '{
  "provider": "byo-phone-number",
  "name": "Cloudonix SIP Number",
  "number": "[your-cloudonix-phone-number]",
  "numberE164CheckEnabled": false,
  "credentialId": "[your-trunk-credential-id]"
}'
For example, let's assume we would like to use the number +12127773456 and our previously created SIP trunk returned the following
as its credentialId - a1b2c3d4e5f6g7h8i9j0k1l2m3n4o5p6q7r8s9. So, your request would look like this:
curl -X POST https://api.vapi.ai/phone-number \
-H "Content-Type: application/json" \
-H "Authorization: Bearer [your-vapi-private-api-key]" \
-d '{
  "provider": "byo-phone-number",
  "name": "Cloudonix SIP Number",
  "number": "+12127773456",
  "numberE164CheckEnabled": false,
  "credentialId": "a1b2c3d4e5f6g7h8i9j0k1l2m3n4o5p6q7r8s9"
}'
Cloudonix Setup
Depending on your requirements, your Cloudonix setup may vary. For this document, we'll illustrate how to setup an outbound SIP trunk with a provider called Telnyx, and then, routing all outbound calls from VAPI.ai to Telnyx.
Outbound Call Routing
Login to your Cloudonix account, and go to your Cloudonix Domain Settings. When there, look for a setting called Allow "border-to-border" calls and enable it. In addition, name sure that Redirect unknown destination to border is also enabled.
Start a VAPI.ai call
The following request will instruct VAPI.ai to initiate a call using Cloudonix:
curl --location 'https://api.vapi.ai/call/phone' \
--header 'Authorization: Bearer [your-vapi-private-api-key]' \
--header 'Content-Type: application/json' \
--data '{
  "assistantId": "[your-assistant-id]",
  "customer": {
    "number": "[formatted-phone-number]",
    "numberE164CheckEnabled": false
  },
  "phoneNumberId": "[your-phone-id]"
}'
For example, based upon our previously created SIP trunk and relevant information:
curl --location 'https://api.vapi.ai/call/phone' \
--header 'Authorization: Bearer [your-vapi-private-api-key]' \
--header 'Content-Type: application/json' \
--data '{
  "assistantId": "7f9c2e4b1a8d6f3h5g9k7m2n4p6r8t1v3x",
  "customer": {
    "number": "+18054101010",
    "numberE164CheckEnabled": false
  },
  "phoneNumberId": "b9f2e8d1c7a6m3k5n4p6r8t1v3x7y9z2w4"
}'
That's it, you should now have outbound calls from VAPI.ai, to Cloudonix and from their to Telnyx, or any other carrier you may like to connect to using Cloudonix.