Container Application Skeleton
Container applications are built of various blocks. There are five block types: static, select, forward, JavaScript and Ruby. To learn more about container applications, click here.
Without going into a Naming Convention rant (or to be more exact, a potential religious war) - we recommend that you use the following naming conventions for your blocks:
| Block Type | Description | Naming Convention | Example |
|---|---|---|---|
static | A static block consists of a static CXML file, performing a pre-determined CXML call-flow script. | cxml_[purpose] | cxml_call_pharmacy |
js | A js block consists of a JavaScript based script, resulting in a CXML outbput. | js_[purpose] | js_lunch_router |
ruby | A ruby block consists of a JavaScript based script, resulting in a CXML outbput. | ruby_[purpose] | ruby_lunch_routed |
select | A select block consists of a set of options a caller can choose, and then once chosen, the call is transfered to a specific block or a voice application endpoint. | select_[purpose] | select_main_menu |
forward | A forward blocks consists of a single block name or a remote voice application URL, where control is transferred to, once the block is executed. | forward_[purpose] | forward_next_block |
Step 1: Create a container application
Login to your Cloudonix account, and select Container Applications from the main menu. The following screen will appear:

Click the button to create a new container application.
When a new container application is created, the platform will require you to create a main block. As a best
practice, we recommend using a DUMMY main block, as our container application will have multiple blocks.
Use the following CXML sample for your main block:
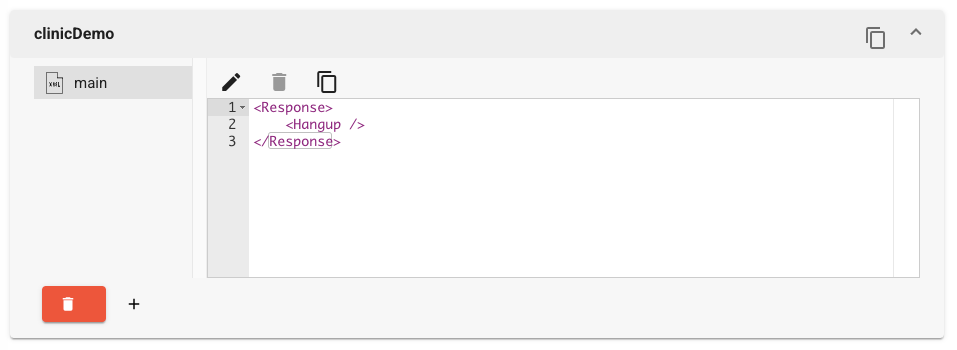
<Response>
  <Hangup />
</Response>
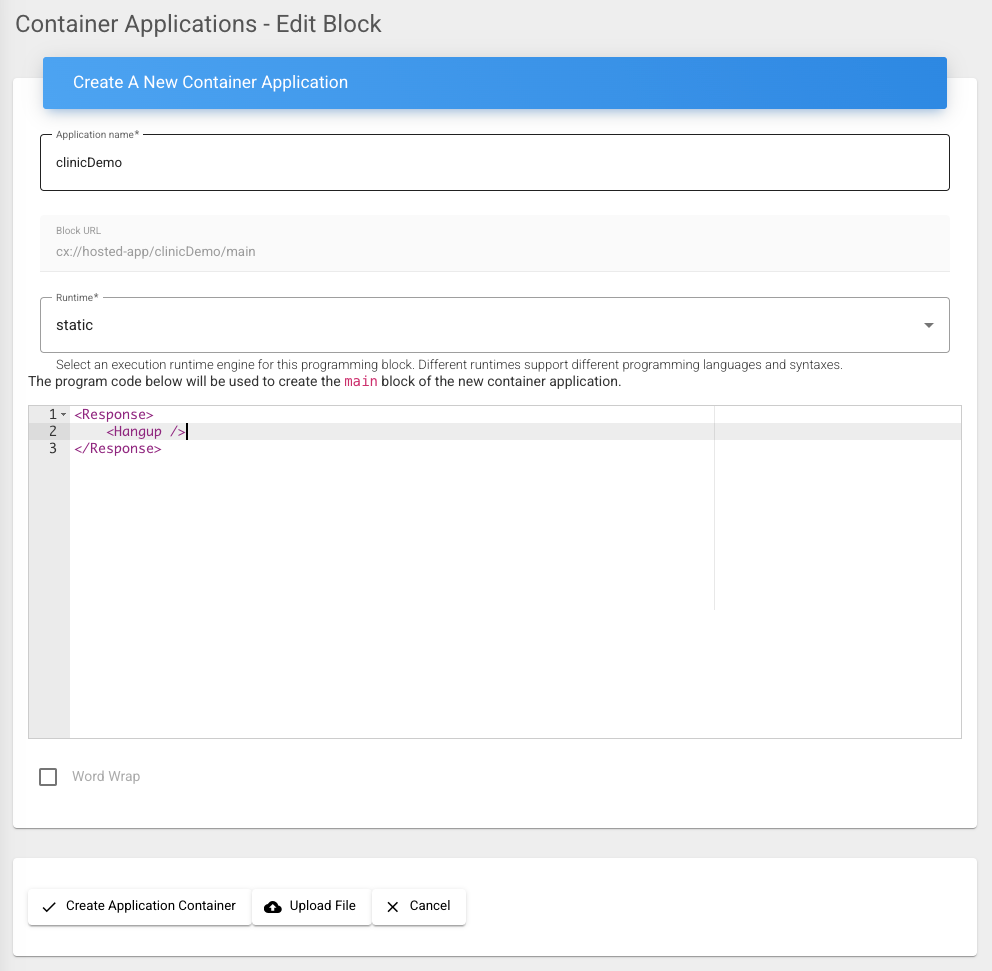
Click the Create Application Container button to finish your container application set. The following screen should appear:
Step 2: Setting up Selector Blocks
We will need to setup two Selector Blocks: Main Menu and Language Selector. Click the located
at the bottom of the block editor, to create a new block. Once inside the editor, use select_mainMenu as the block name. Change the block type to select
to indicate that this is a selector block. Use the following text for your select blocks:
1:js_lunch_router
2:select_language
3:cxml_call_pharmacy
0:cxml_call_receptionist
1:cxml_connect_english_ai
2:cxml_connect_spanish_ai
9:select_main_menu
0:cxml_call_receptionist
Step 3: Setting up Static Blocks
We need to setup 5 specific static blocks. Based on our previous flowchart, here are the static blocks we need to create:
| Block Name | Description |
|---|---|
cxml_menu_main | Playback (or use text-to-speech) announce the main menu of the clinic. |
cxml_menu_language | Playback (or use text-to-speech) announce the language menu. |
cxml_call_back_later | Playback (or use text-to-speech) to the caller that all staff are currently out to lunch and they should callback in an hour. |
cxml_call_receptionist | Transfer the inbound call to the receptionist extension (or a remote phone numberif applicable). |
cxml_connect_english_ai | Transfer the inbound call to a remote voice agent AI service, in English. |
cxml_connect_spanish_ai | Transfer the inbound call to a remote voice agent AI service, in Spanish. |
cxml_call_pharmacy | Transfer the inbound call to the pharmacy extension (or a remote phone numberif applicable). |
Use the following samples as your CXML blocks:
<Response>
    <Say>Welcome to the ACME clinic. For </Say>
    <Transfer>select_main_menu</Transfer>
</Response>
<Response>
    <Say>We're sorry, but our staff are currently out for lunch. Please call back in an hour and we'll be happy to assist you.</Say>
    <Transfer>select_main_menu</Transfer>
</Response>
<Response>
    <Say>We're sorry, but our staff are currently out for lunch. Please call back in an hour and we'll be happy to assist you.</Say>
    <Transfer>select_main_menu</Transfer>
</Response>
<Response>
    <Dial timeout="45">+12127773456</Dial> <!-- Dial the remote receptionist phone number -->
    <Say>Your call is important to us, please hold the line and we'll be with you shortly.</Say>
    <Transfer>cxml_call_receptionist</Transfer>
</Response>
<Response>
    <Dial>
        <Service provider="vapi">+991444555</Service> <!-- Call a VAPI voice agent assistant -->
    </Dial>
    <Hangup />
</Response>
<Response>
    <Dial>
        <Service provider="retell">+991444666</Service> <!-- Call a ReTell voice agent asssitant -->
    </Dial>
    <Hangup />
</Response>
<Response>
    <Dial timeout="45">+12127771111</Dial> <!-- Dial the pharmacy phone number -->
    <Say>Your call is important to us, please hold the line and we'll be with you shortly.</Say>
    <Transfer>cxml_call_receptionist</Transfer>
</Response>
Step 4: Setting up JavaScript Blocks
Implementing our lunch time router will be performed using JavaScript.
We use JavaScript here as it is a simple langauge to understand. If you are un-familiar with JavaScript, we suggest that you review our Make Application, to learn how to build Voice Applications without coding.
Use the following sample as your JavaScript lunch router block:
const httpClient = require('https');

function getTimeInMinutesFromTimeZone(ev) {
    /* Use a remote service to query the time, assuming that our clinic is in Lon-Angeles */
    const url = 'https://timeapi.io/api/time/current/zone?timeZone=America%2FLos_Angeles';

    return httpClient.get(url)
        .then(response => {
            if (!response.ok) {
                throw new Error(`HTTP error! status: ${response.status}`);
            }
            return JSON.parse(response.body);
        })
        .then(data => {
            return data.hour * 60 + data.minute;
        })
        .catch(error => {
            console.error('Failed to fetch time data:', error);
            return null;
        });
}

function timeOfDayRouter(ev, timeOfDay) {
    /* Lunch hour starts at 11:55 AM and ends at 13:30 PM */
    let targetHoursStart = 11;
    let targetMinuteStart = 55;
    let targetHoursEnd = 13;
    let targetMinuteEnd = 30;

    let targetTsStart = targetHoursStart * 60 + targetMinuteStart;
    let targetTsEnd = targetHoursEnd * 60 + targetMinuteEnd;

    let routerCxml = "";

    if ((timeOfDay >= targetTsStart) && (timeOfDay <= targetTsEnd)) {
        routerCxml += "<Redirect>cxml_call_back_later</Redirect>";
    } else {
         routerCxml += "<Redirect>cxml_call_receptionist</Redirect>";
    }
    return routerCxml;
}

function preamble() {
    return '<?xml version="1.0"?>\n';

}

function response(content) {
    return `<Response>\n${content}\n</Response>\n`;
}

exports.handler = function(ev, ctx, callback) {
  try {
    // Asynchronously get time in minutes from the time zone and use it in the callback
    getTimeInMinutesFromTimeZone(ev).then(minutes => {
      // Assume getCXML function needs the minutes data
      const cxmlResponse = timeOfDayRouter(ev, minutes); // Modify getCXML to accept minutes if needed
      callback(null, preamble() + response(cxmlResponse));
    }).catch(err => {
      callback(err);
    });
  } catch (err) {
    callback(err);
  }
};
Congratulations, your container application is now ready to be connected to a voice application.